Showing posts with label 3D. Show all posts

Thursday, May 10, 2012

Sweet Home 3D: Design a House

Yesterday we began exploring features of Sweet Home 3D -- a free 3D home design program which does rendering, animation, etc. The program has an active developer community and a lot of extra models you can download for free.

Sweet Home 3D: http://www.sweethome3d.com
Sweet Home 3D Models: http://www.sweethome3d.com/importModels.jsp

Our goal over the next couple of days is to design a house with at least one bedroom, a kitchen, a living room, and a bathroom.  You are welcome to create additional bedrooms, a family room, a garage, a workshop, or whatever.  Just have fun with it.

When you are finished, take some "photos" (renderings) of different rooms and/or angles to put on your portfolio.

Other web sites with 3D models

The following sites offer also some 3D models at OBJ, DAE, 3DS or LWS formats supported by the furniture import wizard of Sweet Home 3D:
Google 3D Warehouse (a big choice of models at DAE/Collada format)
Resources.blogscopia (free well designed models shown also here)
ArchiBit Generation (various well designed models)
Flying architecture (various models with regular updates)
Kinnarps (office furniture)
Free the models (furniture tested in Sweet Home 3D)
Kolo (bathroom furniture)
Creative-3D.net (a lot of importable furniture, but monochrome)
Klicker (a few chairs and trees)
Model3D.biz (various models, but a few models can't be imported)
Baumgarten Enterprises (a few interesting models, generally for industrial purpose)
3DPlants.com (a lot of plants but without colors, except for the Plant of the month)

OTHER USEFUL DOCUMENTATION:

Create Multi-Story Homes:   http://www.sweethome3d.com/multiLevelHouseGuide.pdf

Creating Sloped Roofs/Ceilings/Etc:   http://www.sweethome3d.com/slopingCeilingGuide.pdf

Plug-Ins & Extentions (Haven't checked yet):    http://www.sweethome3d.com/pluginsUserGuide.pdf


This video tutorial does a pretty good job of showcasing the tools in Sweet Home 3D -- although it's a much earlier version:


Friday, February 17, 2012

Rhino: Inlaid Table with Beveled Edges

Today we are going learn a few new tools to build a decorative table with an inlaid top and carved legs. We will be beveling the edges of a block using the "SOLID > FILLET EDGE" tool. We will create the "carved legs" look by starting with a "Truncated Cone" and then creating a "Spiral Curve", adding a "Pipe", and then doing a "Boolean Difference".

Thursday, February 16, 2012

Rhino: Rubber Duck

Today we're going to learn a few new tools and techniques to build a Rubber Duck. If you need to follow a printed tutorial later, you can check out The Training Manuals online (see previous post).  Today we'll be using Rhino Training Manual Level 1 [pages 156-169].  Following a tutorial from a book [particularly an online book] can be difficult, so I will work through this one with you as well.

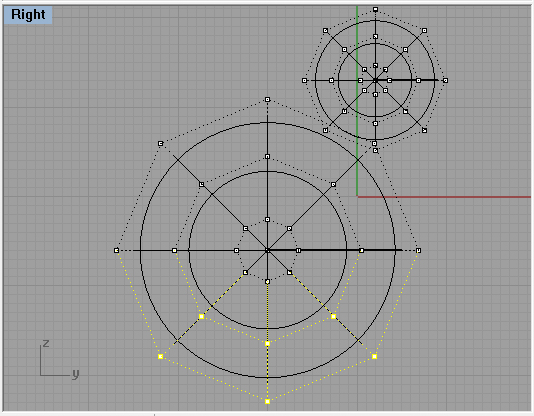
The Basics (see illustrations below):
  1. Create two spheres (head and body) in the RIGHT viewport
  2. Select both spheres and type REBUILD
  3. Set dialog for 8, 8, 3, 3, Delete input, ReTrim, OK
  4. Select the body (or de-select the head)
  5. Turn Control Points on (F10)
  6. Select the bottom 1/3 of Control Points (on the body)
  7. Go to TRANSFORM > SET POINTS and Set Z and Align to World
  8. Drag upward to have a flattened bottom of the ducks body
  9. Drag around some control points to select them and stretch the body to look more "duck-like" (i.e. puff out the chest, pull out the tail shape, etc.).
  10. Turn Control Points off (F11)
  11. Select the head (sphere)
  12. Follow the same select > drag/stretch to form the bill and head shape
  13. Right click on RIGHT to select Ghosted as the view type
  14. Draw a curve (I usually use the free sketch curve) COMPLETELY intersecting the head shape
  15. De-select everything and type SPLIT
  16. Follow the prompts by selecting the object to split (the head) and then the cutting object (the curve)
  17. The bill and head should now be separate objects so you can color/texture them as you wish
  18. Draw a straight line cutting through the base of the head
  19. Copy and paste the straight line, then drag it to intersect the top-right section of the body (copying and pasting keeps the lines perfectly parallel)
  20. Type TRIM and select the pieces to trim (or delete) and press ENTER when finished
  21. Go to SURFACE > BLEND SURFACE 
  22. In the Perspective window (I find this is the easiest to work with in this step) select the first edge of your cut object then press ENTER
  23. Select the second edge (the other cut object) and press ENTER
  24. Check the PREVIEW box and adjust the "bulge" to look its' best 
  25. Add colors/textures/gloss 
  26. Add some shapes (i.e. spheres, ellipsoids (flattened spheres), etc.) to create eyes.


Please Note:  I am trying to teach you the basics of editing shapes (split, trim, blend, etc.) and not necessarily how to build a rubber duck -- so experiment and have fun with it.  You don't have to have a duck that looks exactly like mine [in fact I like creativity].  Here are some examples of creative ducks.  :)


Friday, February 10, 2012

Rhino: Wooden Pull Toy

Today we are going to be creating a wooden pull-toy which will include wheels, axles, a rope, etc.  Remember that a wooden toy for children typically has rounded (filleted) edges.  Because there isn't a definite pattern for this project, I expect it will take a couple days to find a good design, model the body, create the wheels, etc.  Over the next couple days [while you are working on this project] I will also be grading your animations.

Here are some examples of wooden pull toys that I found simply by typing "wooden pull toys" in Google.

Notice the different ways that wheels are done, different painting styles, different types of wood pieces (spheres, flat wood, beveled edges, etc.), and different methods for ropes/pulls.

You can also find woodworking plans on the Internet which you can actually use to create 3D models.  Here are a few examples:
Something else you might want to try is doing a search for "silhouette animal".  Here are a couple examples:
Using the camel silhouette, I traced a curve, extruded it, capped it, filleted the edges, and created the following pull-toy:


Tuesday, February 7, 2012

Rhino: Create a Few Chess Pieces

The plan for today is for you to create a few chess pieces.  Basically you use one of the curve tools to draw a profile of the piece (just like we did with the vase/goblet/bowl) and then "Revolve" the piece.  Instructions for the "Revolve" project are still on the board, but here are the basics:
  • Draw a Curve Shape Profile
  • Type Revolve
  • Select the Curve
  • Set the Beginning Angle to "0" (Press Enter)
  • Set the Revolve for "360" (Press Enter)
If you aren't familiar with the shape of chess pieces, here's an example:
You can see that most of the shapes are done by revolving a profile and then using Boolean Difference to cut out a few shapes here and there.  The biggest difficulty that I can see is the Knight (horse).

Here is my creation for a King and a Pawn. You can see my profile drawing and where I set the Axis (in red).  Notice that my profile for the Queen is shown, but I added a Sphere to the top to make it look like a pawn.

There are many styles, sizes, and materials for chess sets so don't feel like you're locked into a specific design.  Here are a few unusual examples:


Note: You don't have to create an entire chess set.  You can create a few chess pieces to sit on your chess board.

REMEMBER:

•  Add your name to your projects
•  Save Photoshop projects as PSD and JPG
•  Save Bryce projects as BR7 and [Save Image As] JPG
•  Save Sculptris projects as SC1 and JPG and export it as an OBJ.
•  Save Rhino projects as 3DM and JPG
•  Save Flash projects as FLA and go to FILE>PUBLISH SETTINGS and publish as SWF and JPG
•  Upload finished projects to your portfolio and/or your DeviantArt page
•  Keep checking your grade on PowerSchool