Unfortunately I need to be out today with my wife as she goes through a medical procedure. Please use your time to work on your Flash projects and get them uploaded to your DeviantArt page. Next week we will be learning some more complex Flash projects.
Draw a background (if necessary) and name it "Background"
Create a new layer for your animated object(s)
Draw an object that you want to animate
Notice that there's a • in the framer where you drew your picture. This indicates a "Keyframe"
If you Right-Click on the box directly to the right of your Keyframe, you can do "Insert Keyframe" -- or "Insert Blank Keyframe" if you would like to start with a blank frame.
You may notice that you no longer see a background on your "movie" -- this is okay because it's easy to fix at the end. You simply right-click in the very last frame on the "Background" layer and choose "Insert Frame".
Next, save your movie to your Thawspace [as an FLA] and do a CTRL+ENTER to test your movie.
Traditional animation (Disney cartoons, Spongebob, anime and manga) is an illusion of movement. You don't actually see things moving -- you see a series of drawings placed one after another [around 24-30 images per second] which makes your brain believe it sees movement. That phenomenon is called Persistence of Vision. Traditionally an artist draws/paints 24-30 drawings for every 1 second of animation. With computers as tools, artists have the luxury of having computers complete the "in-between" frames automatically. For example, you draw two shapes: a circle in one corner of the screen on frame 1 and then in the opposite corner around 10 seconds later -- and then you tell the computer to figure out the "in-between" (or "tween").
The nice thing about computerized "tweens" is that image one can be a tiny red circle and image 2 can be a large green square, and the computer will gradually morph them from frame to frame.
Here is a sample video:
Over 100 years ago "arcades" were full of machines that people would put coins in and look through the viewfinder as they turned a crank which would flip through a series of photographs on a big spool. More modern examples of this technology is a "flip book". Typically these are done by rapidly flipping through images to create the illusion of motion.
Here's a great example of using Post-It notes to create a flip book movie:
Today we have a guest speaker from Empire College in Santa Rosa. Gay Kimmel has visited us before, and I am happy that she is coming all the way over to Kelseyville for another visit. I expect everybody to be respectful and polite, and to pay attention to the presentation.
Use the instructions below to create a few different 3D buttons. They should either be different colors or change to different colors when being "moused over". You might want to try round *and* square buttons using the same technique.
Do a search for "Sound Effects" and "WAV files" so you can add some sound to your buttons. Here are some examples:
If you want to do some 3D-like shapes, you can do so with a gradient fill and ovals [or rectangles].
First we create a basic shape.
Next we Fill the shape with a gradient in the top-left corner. Notice how it appears rounded or concave.
Then we create a smaller circle and fill it with a gradient in the bottom-right corner. Notice the way it looks "inverted concave" now.
Create another circle (smaller than the second) and fill it with a gradient in the top-left again. Now it appears to be a rounded button with a "frame".
Adding a color gradient (green for example)...
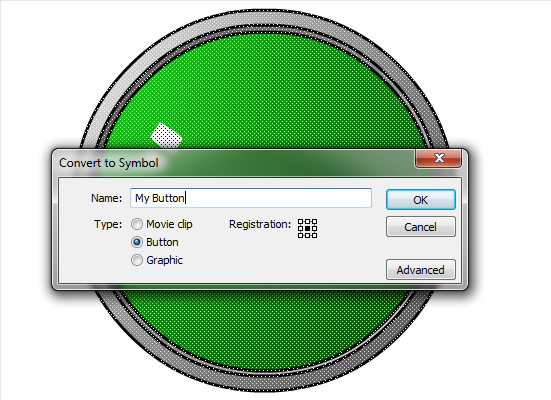
and then painting on a little white for reflection makes it a little more "glassy".
Next you select the entire shape and Convert To Symbol, choosing "Button" as your symbol type.
Your button will appear as a single piece with a bright blue border around it.
Double-click your new symbol and you will see the "button instances".
Here you can see the Up, Over, Down, and Hit instances.
The full screen appears like this.
You can right-click on each of the instances (Over, Down and Hit) to INSERT KEYFRAME. This will copy the Up keyframe so you can start with the same shape and placement.
Change each "instance" to reflect a different look.
When you do a CTRL+ENTER it creates an SWF wherever you have your file saved and previews the "movie" on top of your Flash window.
Making buttons in flash isn't as difficult as you might think. You can make a drawing (or even just a circle, square, or other shape) and convert it to a button.
Draw the shape(s) that you would like to become the button.
Select the shape(s) either by clicking/shift-clicking on them or drag a box around them.
Select MODIFY > CONVERT TO SYMBOL (or right-click the selected shapes and choose Convert to Symbol)
Select the "Button" option.
Notice that the "timeline" has been replaced with 4 squares -- or "button states".
Up: This is what your button will look like when untouched.
Over: This is what your button will look like when you move your mouse over it.
Down: This is what your button will look like when you click it.
Hit: This is the area of the button that is "encounterable".
Adjust your button states to set how your button will appear to users.
Do a CTRL+ENTER to test your movie and see how your button works.
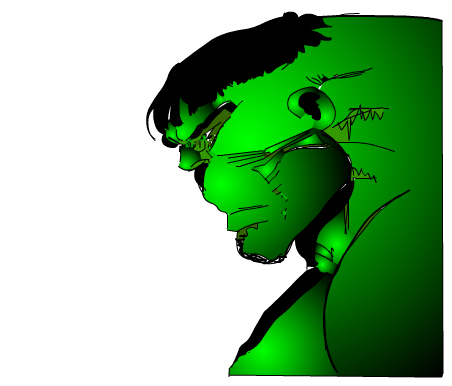
The "Trace an Image" project really helps build skills with the drawing tools and gives us a good baseline for future projects. Here are the steps I recommend for getting started:
Open Flash and create new document (either ActionScript 2.0 or 3.0)
Open an Internet browser and find a picture that you would like to copy. Although cartoons and line art drawings are easier, I recommend starting with a photo and seeing what effects you can get.
Copy the picture (Right-Click and select Copy)
Open Flash and Paste your image (Right-Click and select Paste)
Go to Modify > Document
Click on "Contents" and click "OK"
Press CTRL+2 to fill the screen with the largest size possible
Create a new layer (the little square "folded corner" icon under your layers
Begin tracing your image
When completely finished tracing your project, delete your original photo layer. Note: You can temporarily "hide" your original photo by clicking to dot under the eyeball on the layer holding the original photo.
Save your completed file to your Thawspace
Press CTRL+ENTER to test your finished project (this also creates an SWF file)
I would like you to spend today and tomorrow creating these traced images. If you complete one quickly, do another one. You can use these in another project in a few days.
Today we begin Adobe Flash -- a program designed to create graphics, animation and interactivity for the Web. After exploring the basic tools and menu options, we will be drawing a simple Flash picture. The finished picture will be saved to Thawspace as an FLA file (Flash Source File) and then we will do a CTRL+ENTER to "Test Movie" -- a step which creates an SWF file (Shockwave Format) with the same name as the FLA file.
FLA files are Flash "editable" files -- really, the only way to open one is to use Flash. The SWF files are able to be opened without another program, embedded on a web page, etc. You can also save projects as Animated GIF files, but any interactivity is lost.
There is a folder on your desktop called "Drop Box" which should have a Flash file in it. Open that file in Adobe Flash. We will be using that file to learn some basic manipulation with Flash tools.
I added additional steps and ideas to the Air/Space Craft project that we started yesterday. Look it over and complete the project, then post the finished result to your portfolio.
If you are working on your own track, make sure you indicate your progress on your portfolio. Adding screenshots or finished projects is appreciated.
• Add your name to your projects
• Save Photoshop projects as PSD and JPG
• Save Bryce projects as BR7 and [Save Image As] JPG
• Save Sculptris projects as SC1 and JPG and export it as an OBJ.
• Save Rhino projects as 3DM and JPG
• Save Flash projects as FLA and go to FILE>PUBLISH SETTINGS and publish as SWF and JPG
• Upload finished projects to your portfolio and/or your DeviantArt page
• Keep checking your grade on PowerSchool

 As always, I expect respect, attention, and valid, appropriate questions for our guest speakers.