Wednesday, February 29, 2012

Rhino: Create an Aircraft / Spacecraft

Today we will be using the "box modeling" process to create an air or space vehicle.
  1. Create a new Rhino document using "Large Object > Inches".
  2. Create the basic starting shape.  In my example, I start with a box that is approximately the size of the air/space craft.
  3. Click "Explode" to break the box into individual surfaces.
  4. Type "Rebuild" and enter your preferred mesh settings (I do 8,8,3,3)
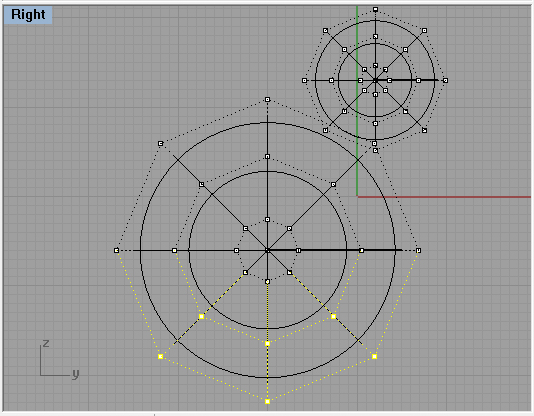
  5. Turn on Control Points (F10)
  6. Select Control Points and stretch your box shape into the shape you desire.  I try to select points on the opposite side
Box has been pulled into a shape looking like an air/space craft.

Textures have been applied.  I used a line to cut out a cockpit window and made it black and glossy.

I added a large, flat wall behind the spaceship and applied a texture to make it look like space.

I finish by positioning the scene, zooming in, rendering and saving the finished project.

Tuesday, February 28, 2012

Get a deviantART Page...

One way of showcasing your work and getting feedback from others around the world is to create a deviantART page.

After you have created your page, update your portfolio.  You can use a picture of yourself or one of your projects as a profile picture if you would like.

Next, upload a few of your projects -- some things that you would be proud of.  Give good descriptions and choose the best category for each.

Finally, go to the KHSCOMPUTERS deviantART page and "add a comment" letting me know your real name (first name is fine) and click on the +Watch button on the top-right section of the screen.

Monday, February 27, 2012

Alternate Projects

If you are following along with the class (currently we are in Rhino) then continue to work on projects and upload finished work to your portfolio.

If you are choosing to be on an alternate track, you MUST let me know so that I can put you in a different grading track.  I also expect you to keep track of what you do on a daily basis and post your weekly progress on your blog.

For example (and you might want to include a shot of your project(s)):

ALTERNATE PROJECTS: 02/27-03/01

Monday: I gathered images for a Steampunk collage that I want to work on.  I have ideas to find stopwatches and gears and such.
Tuesday: I began piecing the images together in Photoshop and changed the background color.
Wednesday: I finished the collage and added a lens flare and some text.  I really like the project overall but might change the color.
Thursday:  I created a deviantART page and uploaded my projects.
Friday:  I began putting my projects into a PhotoStory project.

Weekly Summary: I would give myself 95% this week because I worked really hard and did well.  I got sidetracked a little when I was looking at Steampunk fashion.

Thursday, February 23, 2012

Guest Speaker Tomorrow!

Our guest speaker tomorrow is Mike Dobkin from DeVry University.  He will be doing an "Interactive Careers" demonstration.

You will be receiving credit for being respectful and attentive during the presentation.  If you are disruptive, ask meaningless or off-topic questions, or otherwise fail to participate, you will receive a zero for the day.

If you have suggestions or ideas for guest speakers, please let me know.

Rhino: Furniture and Objects

Adding items such as lamps can actually be very easy.  For example, if you look at the diagram on the left, you will see that I drew two curves, revolved each of them, and added a light source for a quick and easy table lamp.

There are a variety of different lamp shapes, lamp shade styles, etc.  You can even create a variety of table lamps to save for future projects.

You may also want to play with desk lamps with flexible bases (see example below).  Simply draw a curve and use the "Pipe" command to make the pipe.


Other pieces that are fairly easy to build include furniture items such as desks or beds.  If you do a search for "desk dimensions" or "bed dimensions" you can often find good diagrams (or even plans) for putting the pieces together.

I am including a couple examples to get you started.  Notice in the dresser design, that it consists of 10 boxes.  You really just need a simple design to convey what the furniture is.  Since we won't be opening the drawers of the dresser, we don't even need to hollow them out.

Wednesday, February 22, 2012

Rhino: Begin Room Layout

(You can click any of the images below to enlarge)
We begin this project by placing our floor.  If your room is rectangular (as the example shows) it is pretty easy to plot it out.  I started my room in coordinate 0,0, entered 144" (12 ft.) for the length and 120" (10 ft.) for the width -- and then specified 3" for the floor thickness.

Next I began adding walls by specifying the length, height (I did 96" for 8 foot ceilings), and the wall thickness (I did 3" -- but remember to add to your room length when adding walls)

Next I added the remaining walls.  After you get two connected walls you can simply copy and paste to make new walls.

I remove one wall so I can see into the room easier -- similar to a dollhouse view.  I also add a doorway and window opening by doing a boolean difference.

Next I began adding some details.  In this case, a mattress and box springs (two boxes with filleted edges), and feet for the bed.

I continue adding details by adding "lofted" curtains (2 curves lofted together), a pillow, and a rug in front of the door.  I am also in the process of adding a poster to the wall -- in this case just a box (.25 inches thick) with a texture I will apply next.

I add textures, lights, gloss, transparency, etc for my nearly finished scene.

Tuesday, February 21, 2012

Reminder: Measure Your Room (Due Tomorrow)

Tomorrow we will begin building our room with the measurements you have taken at home.

Make notes about where your doors and windows are, where furniture is placed, etc.

Try to measure everything in inches -- for example, if the room was 10 feet long it would be 120 inches.  If a door was 7 feet tall it would be 84 inches.

Rhino: Tissue Box

Today we will be putting together a tissue box in Rhino using exact dimensions and a new "loft" technique to join two curves together.  We will also use the "bend" command to adjust a tissue emerging from the box.
  1. Begin your project as "Small Object - Inches"
  2. Create a box shape with the exact dimensions of a tissue box
    1. Our example box is:  ______" wide by ______" long by ______" high.
  3. You can lightly fillet the edges if you would like a little bit of rounded edge
  4. Draw a curve [in the top viewport] which will be the open space on the top of the box.
  5. Extrude the curve to go through the box top, then cap it to make a solid shape.
  6. Do a Boolean Difference, keeping the box and using the new shape as your cutting object.
  7. Create a box inside the main box [make sure it's not touching any of the edges]
  8. Do a Boolean Difference, keeping the outer box and using the inner box as the cutting object.
  9. Draw a curvy line which will be the top of the tissue and drag it up above the tissue box
  10. Draw a curvy line which will be the bottom of the tissue and drag it toward the bottom of the box
  11. Draw a shorter straight line which will be the exit point for your tissue.
  12. Deselect everything and type "Loft"
  13. Select all 3 curves (the lines we will be using for the tissue) and press Enter.
  14. Bend your tissue until it looks fairly natural.
  15. Apply textures and transparencies to taste.  :)

Friday, February 17, 2012

Rhino: Inlaid Table with Beveled Edges

Today we are going learn a few new tools to build a decorative table with an inlaid top and carved legs. We will be beveling the edges of a block using the "SOLID > FILLET EDGE" tool. We will create the "carved legs" look by starting with a "Truncated Cone" and then creating a "Spiral Curve", adding a "Pipe", and then doing a "Boolean Difference".

Thursday, February 16, 2012

Rhino: Rubber Duck

Today we're going to learn a few new tools and techniques to build a Rubber Duck. If you need to follow a printed tutorial later, you can check out The Training Manuals online (see previous post).  Today we'll be using Rhino Training Manual Level 1 [pages 156-169].  Following a tutorial from a book [particularly an online book] can be difficult, so I will work through this one with you as well.

The Basics (see illustrations below):
  1. Create two spheres (head and body) in the RIGHT viewport
  2. Select both spheres and type REBUILD
  3. Set dialog for 8, 8, 3, 3, Delete input, ReTrim, OK
  4. Select the body (or de-select the head)
  5. Turn Control Points on (F10)
  6. Select the bottom 1/3 of Control Points (on the body)
  7. Go to TRANSFORM > SET POINTS and Set Z and Align to World
  8. Drag upward to have a flattened bottom of the ducks body
  9. Drag around some control points to select them and stretch the body to look more "duck-like" (i.e. puff out the chest, pull out the tail shape, etc.).
  10. Turn Control Points off (F11)
  11. Select the head (sphere)
  12. Follow the same select > drag/stretch to form the bill and head shape
  13. Right click on RIGHT to select Ghosted as the view type
  14. Draw a curve (I usually use the free sketch curve) COMPLETELY intersecting the head shape
  15. De-select everything and type SPLIT
  16. Follow the prompts by selecting the object to split (the head) and then the cutting object (the curve)
  17. The bill and head should now be separate objects so you can color/texture them as you wish
  18. Draw a straight line cutting through the base of the head
  19. Copy and paste the straight line, then drag it to intersect the top-right section of the body (copying and pasting keeps the lines perfectly parallel)
  20. Type TRIM and select the pieces to trim (or delete) and press ENTER when finished
  21. Go to SURFACE > BLEND SURFACE 
  22. In the Perspective window (I find this is the easiest to work with in this step) select the first edge of your cut object then press ENTER
  23. Select the second edge (the other cut object) and press ENTER
  24. Check the PREVIEW box and adjust the "bulge" to look its' best 
  25. Add colors/textures/gloss 
  26. Add some shapes (i.e. spheres, ellipsoids (flattened spheres), etc.) to create eyes.


Please Note:  I am trying to teach you the basics of editing shapes (split, trim, blend, etc.) and not necessarily how to build a rubber duck -- so experiment and have fun with it.  You don't have to have a duck that looks exactly like mine [in fact I like creativity].  Here are some examples of creative ducks.  :)


Wednesday, February 15, 2012

Rhino: Flashlight Model

Today we are going to be working through a classic Rhino tutorial -- we will build a flashlight.

Follow along with the text as much as possible and see what you come up with.
http://www.rhino3d.com/4/help/Getting_Started/Flashlight_000.htm

Here are a couple examples created by students:

Monday, February 13, 2012

Rhino: Work on Chess Boards, Chess Pieces and Pull Toys

On Thursday and Friday of last week I kind of threw chess pieces and pull toys at you and didn't give you much time to work on them.  Today, tomorrow and Wednesday I would like you to work on them.

I would also like you to feature them on a table of some sort with a floor and walls.  Remember that a large block makes the floor, another large block makes a wall, and another makes another wall.  The you can add a block as a table (or actually make a table) and shine some spotlights on it.

Add your checker/chess board to the table and adjust the lights if necessary.

Some specifics:
  • Chess Pieces:  Complete a full chess set (Pawn, Rook, Knight, Bishop, Queen and King)

 Pull Toys: 
    • Trace an object (animal, vehicle, etc.) and extrude it and cap it.
    • Create a block for the object to sit on
    • Add axles and wheels (I use cylinders)
      • I also use Filletedge on these to round them off
    • Draw a curve that will become the string or rope
      • Select the curve and type "Pipe"
        • Set the width of the first end (i.e. .25")
        • Set the width of the other end (i.e. .25")
        • Press ENTER
    • Add textures and bump maps

REMEMBER:

•  Add your name to your projects
•  Save Photoshop projects as PSD and JPG
•  Save Bryce projects as BR7 and [Save Image As] JPG
•  Save Sculptris projects as SC1 and JPG and export it as an OBJ.
•  Save Rhino projects as 3DM and JPG
•  Save Flash projects as FLA and go to FILE>PUBLISH SETTINGS and publish as SWF and JPG
•  Upload finished projects to your portfolio and/or your DeviantArt page
•  Keep checking your grade on PowerSchool