Wednesday, November 30, 2011

Bryce: 3D Logo

Today we're going to experiment with using Bryce Symmetrical Lattice to make a 3D logo.  On the right you can see the finished YouTube logo in 3D, while on the left (below) you can see the original.  I applied the logo to the Symmetrical Lattice.

I am also attaching a tutorial video (below) for those who would like to try this at home.

Here are some sample logo patterns -- however you should find (or create) your own:
Here are a couple different versions of a logo which you can use to create a "stained glass" effect.  The left image being the "glass" and the right image being the "lead" borders:
Basically I create the first shape (a symmetrical lattice) and then COPY it and PASTE the second shape directly on top of the first shape.  Then I just have to apply a new "bump map".  See below:
 Here's how it would look fully rendered in Bryce:

Monday, November 28, 2011

Bryce: City Scene
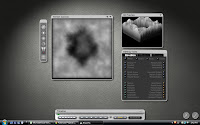
Today and tomorrow we are going to be using both PhotoShop and Bryce.  We will create a grayscale image in PhotoShop (size 512 x 512 pixels) with several shapes (mostly rectangles) which we will use to apply to our mountain (terrain editor).  This will effectively allow us to create a city in Bryce using a single mountain.

An example of the grayscale image is seen on the left.  The brightest (white) colors will be the tallest points and the darkest (black) colors will be the lowest points.  Obviously the different shades of gray will be mid-size buildings.

I am also including a video tutorial below if you should want to watch this tutorial again. [Or if your family or friends would like to create something like this.]


Here are three very different examples of texture "bump maps" to create city scenes:


This is a beautiful example of what you can do with this -- although there was significant editing after the initial creation.
You can use this technique in creating individual buildings as well.  The rounded building on the above-right image is an example of that.  Here are a few examples of "bump maps" that you can use for interesting buildings.


Friday, November 18, 2011

Buy: Adobe Creative Suite 5.5 Design Premium Student Edition

Adobe Creative Suite 5.5 Design Premium Student and Teacher Edition

Several students have been asking about purchasing Adobe Photoshop.  As a student in a high school or community college, you have access to buy the full Adobe Creative Suite Design Premium for $449.  I know that's very expensive [I can't afford it myself] but if you are looking at entering a career in design, image editing, etc., it's a must-have -- and regular price is $1899!

Included in this bundle is:
  • Adobe Photoshop Extended
  • Illustrator
  • InDesign
  • Dreamweaver
  • Flash Professional
  • Flash Catalyst
  • Fireworks
  • Acrobat Pro
Again, this isn't something you need for my class, but it's definitely a good deal.

If the full suite isn't for you but you really want Photoshop, you can buy Photoshop individually for $199.

Adobe Photoshop CS5 Extended Student and Teacher Edition

Get Caught Up

I would like you to use your time today to do the following:
  • Check your grade
  • Complete any projects you are still missing
  • Get missing projects on your portfolio
    [I will grade portfolios over break]
  • Finish homework for other classes so you can enjoy your week off
  • Have some free time
  • Have a great Thanksgiving Break!

Thursday, November 17, 2011

Bryce: Forest Scene
Today we will be using the Bryce Terrain Editor to think a little bit outside the box.  We will be creating a forest by using the "terrain" tool.  In fact, we will be using a terrain for the ground, a terrain for the trees, and a terrain for some background mountains.  We will also include some fog, a variety of textures, some miscellaneous plants, and an effective sky.

I am also including a "video tutorial" below if you need to go over this again in the future.

Wednesday, November 16, 2011

Bryce: Desert Scene

Today we are going to use our Terrain Editor, the sky editor, and some haze to make a scene that appears to be a desert.

I will also be including a video tutorial below for those who need to review the in-class lesson -- or for those who are absent during the demonstration.  Unfortunately, YouTube is blocked on our campus but I can download a copy of the tutorial if you need it.

Tuesday, November 15, 2011

Bryce: River Valley

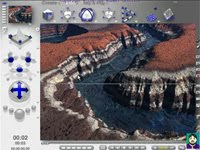
Today we will use the Terrain Editor to build a river valley / canyon.  It will be similar in setup to the Island project from yesterday -- you will have a "mountain" (terrain), water, and a good sky texture. 

We will level out our terrain, apply spikes & mounds, and user a smaller brush with lower elevation levels to "cut in" a river valley.  Then we will add some "eroding" to make the scene more natural, followed by a little "noise" to make things less flat.

Remember to start out with FILE > NEW DOCUMENT > STANDARD > 800x600 (or 1024x768).

Monday, November 14, 2011

Bryce: Lake / Pond Scene

Today we will use the Bryce Terrain editor to create a lake scene:
  • Insert a Terrain
  • Paint the entire Terrain with a dark gray (very low elevation)
  • Use the soft-edged, smaller brush on the lowest (black) elevation to paint a lake shape
  • Exit the Terrain editor (check mark) to view your new Terrain
  • Click EDIT and drag the Y Axis (Resize) down to flatten your terrain
  • Add a Water Plain and use the  Y Axis (Reposition) to move the water to the appropriate level (so that it shows inside your lake cut-out but doesn't cover the entire Terrain
  • Add finishing touches (additional Terrains for background, adjust textures, change your sky, etc.)
When finished:
  • Save As (as a .BR7 file) to your Thawspace
  • Render your picture
  • When finished Rendering, "Save Image As" and  select JPEG
  • Upload your JPEG to your portfolio blog

Thursday, November 10, 2011

Bryce: Island Scene

Today we will be using Bryce to create a basic island.  You will need to include some of the basics here including the flat plane, the "mountain" terrain, and water.  We will also be editing the "mountain", changing textures, and adjusting the sky/environment.  I will give some specific direction for this project in class. 

What I would like from you is the following:

  • Change the texture of the first Plane
  • Add a "Mountain" (Terrain)
    • Adjust it so it sinks slightly below the Plane
    • Edit the Terrain (click the "E")
      • Adjust the shape of the mountain
      • Add some Erosion
    • Change the texture of the Terrain
  • Add a Water Plane
    • Edit the texture of the Water
  • Change the Sky
    • Be creative and adjust fog, haze, colors, etc.

Also, if you would like to view a "video tutorial", I am including one below [if you can view the video inside the schools firewall].

Wednesday, November 9, 2011

Bryce: Beginning

Bryce Personal Learning Edition is a 3D landscaping and animation tool. With Bryce 7 you can add unbelievable realism with Image Based Lighting, true instancing, improved skies and clouds, and even particle emitters.

This Personal Learning Edition (PLE) of Bryce 7 is a full-version with no watermarks or limitations of any kind in the program itself. The licensing allows for strictly personal, non-commercial use.
(DOWNLOAD IT)
SERIAL CODE:  BDZPLED-070-0000000-NBA-001-HBUVMLF


Note:  I had difficulty installing this on some of my computers, so I had to install the "DAZ3D Studio" program first.  You can download it free as well (DOWNLOAD IT).  We will be using that program to do some additional 3D graphics (including posing characters in a 3D scene).

Let me know if you have any questions about getting these installed.

Thursday, November 3, 2011

Photoshop: Public Service Poster

Click to View Full Size
On Friday (tomorrow) we are going to begin putting together a "Public Service Poster".  These should be attention-getting, make a strong impression, and be school appropriate.  Take this project seriously -- because I do.

I will be giving extra credit to projects that I believe are good enough to print and hang up.

Project Specifics:
  • 8.5 Inches x 11 Inches (you choose orientation)
  • 150 DPI Resolution
You can choose from these options:

1. Anti-Smoking / Tobacco Campaign
Create a poster to discourage someone from using/selling tobacco products.  Include a fact (or facts) -- Here are some to get you started:  http://www.tobaccofreeca.com/resources/ 
2. Above the Influence / Anti Drug Campaign
Create a poster to discourage someone from using drugs.  Include facts about which drug(s) you are dissuading people from using.  For example, did you know that more teens are in treatment facilities for "marijuana dependency" than all other illicit drugs combined?  Or that young people who smoke marijuana are more than twice as likely to have depression later in life?  Here are some more facts to get you started: http://www.abovetheinfluence.com/facts/drugfacts 
3. Domestic Violence Prevention
Create a poster to let people know how/where to get help if they are the victims of domestic violence, dating violence, etc.  Try to find local resources (i.e. phone numbers).  Use some facts about the issue as well: http://domesticviolencestatistics.org/domestic-violence-statistics/
4. Texting While Driving
Create a poster letting people know about the dangers of driving while texting.  While it's a relatively new problem, a lot is being said about it.  Remember to include facts.  For example, you are 4 times as likely to cause an accident while driving after drinking... but 8 times as likely to drive while texting.  Here is a place to start: http://www.infographicsshowcase.com/driving-while-texting-infographic/ 
Here are some examples of posters:


REMEMBER:

•  Add your name to your projects
•  Save Photoshop projects as PSD and JPG
•  Save Bryce projects as BR7 and [Save Image As] JPG
•  Save Sculptris projects as SC1 and JPG and export it as an OBJ.
•  Save Rhino projects as 3DM and JPG
•  Save Flash projects as FLA and go to FILE>PUBLISH SETTINGS and publish as SWF and JPG
•  Upload finished projects to your portfolio and/or your DeviantArt page
•  Keep checking your grade on PowerSchool